
There has been a large amount of chatter on Techlore about Sony convergence ic problems. Luckily Most Sony projection tv's no matter what model you have should be similar to my explanation below, Since Sony rarely fully re-engineers a tv what I am about to say will apply to most Sony projection TV's. A service manual is generally not needed to perform the repair.
WARNING! If you don't have any electronic experience this is not for you, I assume no liability for any harm that may come to you or your tv. Perform this procedure totally at your own risk. High Voltages exist in your tv and on the boards I am going to talk about, and can have high voltages on them even after the tv is unplugged.
What has happened to your tv:
What has normally happened is that the convergence output driver ic's either one or both of them has shorted. Causing your picture to be un-converged, The Symptom of your failure can take on many different looks, so one explanation of what the failure looks like will not be adequate. It will be basically one or more (red,Green,Blue) crt's are not aligned correctly, and colored shifted, and distorted picture of some kind will be seen. Auto focus will not fixit and may even make it worse. When these ic's short, they can cause one or more pico fuse to blow. Allot of people ignore this part of the repair and get themselves into trouble. Please listen to my warning, and make sure you check these fuses!
About the boards:
The two boards we will be working with are the "D" and "G" boards. They will have a big "D" or "G" stamped into them. On most models the "D" board will be to the center left of you when looking from the back. The "G" board will usually be to the left of the "D" board and standing vertically. When removing the board make a mental note of where all the plugs go. The Flyback (the big gray transformer near the back) has a fat red wire coming out of it. To remove this wire push down and twist on the distribution block side. Don't try to remove it from the flyback side, you can damage the flyback. There is a focus wire going upto the focus block as well, pull the wire straight out of the focus block side. But if you have enough room to work behind your television you can leave the red and focus wires in the tv, just flip the board over at the television after removal.
The Parts:
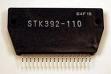
The parts you will need are two ic's that are referred to as STK ic's. This is in reference to the first three letters of the part number. You will also need some pico fuses. The pico fuses are little yellow fuses that look like resistors. When they blow, they will show no physical sign of failure. The amperage rating will be printed on the fuse. For example a 5 amp fuse will have the number 5000 on it. A 3.15 amp fuse will have the number 3150 on it. You will need to use an ohm meter to test these fuses.![]()
![]()
![]()
If your set uses either STK392-110, or STK392-120, you should replace them with a higher wattage part; either the STK392-150 or STK392-180. Since this is a very prolific problem, there are allot of companies that make cheap bad ic's that can be purchased usually for around $6.00 - These replacement ic's are BAD, they will FAIL on you again. I have had allot of experience with this problem, please listen to my warning! Only get a set that is from a reputable manufacturer. If your ic part number is something other than the ones I mentioned above, ONLY use the EXACT same part number for replacement. The part number is boldly printed on the part.
The Location of the parts;
The stk ic's are on the "D" board, attached to large heat sinks, When looking from the back you can see the heat sinks but the part's themselves will be pointing away from you and hard to see without removing the board, or using a mirror to look at the part numbers. The fuses are generally located under the fins of the heat sinks. There are several of them and vary by model. On the "G" board there will be two yellow pico fuses near the connector going to "D" board. These fuses provide power to the stk ic's you must check these as well.
The Repair:
When replacing the STKs make sure you use heat sink compound on the back of the ic's before installing them. Also as a rule of thumb, screw or clamp the ic's down to their heat sinks before you solder the pins. Replace any blown pico fuses and re- install your boards. When you turn your set on it may still be out of convergence due to many factors. Try pressing the auto focus button on front of your set. If this does not work, you will need to do a convergence. Please see my article "Sony Convergence Procedure" to complete this part.
Possible Problems after the repair;
Many things can happen during your repair, the most common problem and one that even I - an experienced tech still have problems with are not plugging in all the wires. This will cause various strange problems. So if the set acts differently than It did before. First suspect that you have missed a wire. Don't assume that you got all the wires in. it is extremely easy to miss one. I have had people and techs tell me "I am sure I plugged in all the wires" but when I investigate a little further we find that wire that was hidden behind something else and once we plug it, all will be well. Another issue you need to be aware of is if you are in convergence mode and you cannot move one of the colors in either vertical or horizontal directions. Re-check you pico fuses and solder. 99% of these problems are due to either shorted pins or a missed pico fuse.
More Advice?
If you have more questions about this repair, start a conversation on this board and I will help you with your question. Please include the model number of the set so my responses can be specific.


Comments
i was poking around in the
i was poking around in the back and pushed down on the ics, before i read this blog and realized that these were soldered connections, and the problem went away. is there a socket connection in there i didn't see that i was actually reseating?
No, try re-soldering the pins
No, try re-soldering the pins, it may fix your problem; bad solder can be a cause of this problem too, but it usaly is the ic's themselfs.
Larry Dillon said: Also I do
Larry, I have a convergence problem with my Sony KP-46WT510 and am looking for repair/schematics manual. I have recently replaced the high volt assembly block and now have the two STK's for this model. Will download software to open once received.
Thanks,
[email protected]
Dave, I sent you out the
Dave, I sent you out the service manual. Good Luck with your repair. Make sure you read this article completely and understand it, as well as this one too!
http://www.techlore.com/article/19631/Sony-Convergence-Procedure/
Hey everyone I'm new to the
Hey everyone I'm new to the site. I just obtained a sony KP-57WS500 from my neighbor, for free, with a convergence issue. He bought a new 52" samsung LCD because he didn't want to mess with it anymore. He said he had the TV repaired about a year ago with the same isssue.
I was hoping to replace the IC's and be good but it appears the last guy snapped the D board at the HV transformer. I would assume trying to remove the HV cable. He soldered several traces together it may still work but I'm not sure.
I was hoping someone would know where I might buy a replacement populated D board. I thought I may buy a whole TV with a gun out if I could find one. Anyone have any leads?
Thanks in advance
Diesel
Sony does not have the board
Sony does not have the board anymore, try pts corp. Still check the fuses on g board.
I actually only live an hour
I actually only live an hour away from Bloomington, PTS headquaters. I'll call them tomorrow.
Thanks
I just wanted to thank Larry
I just wanted to thank Larry and the rest of the contributing team on posting this convergence fix. I was able to replace the IC's and one fuse with little difficulty and for less than $40. However, I can inform you all of one lessons learned. After I replaced the chips and one fuse, I still had the same convergence issue. I then entered into the Service Mode and tried to make adjustments, but nothing seemed to work right. After about 1 hour of wasting time I went back to basics so I checked all the fuses again but they were good and the voltage levels were OK. Then I checked the cable connections and Wa La!! Eventhough Larry mentioned to check all the connections, I was still able to screw it up. There was one cluster of cable harnesses in the front of the board to the right of the IC's and I accidently swapped the red and green cables (the connectors had red and green paint on them). When that was corrected the picture looked much better. I still had to fine tune the converence slightly in the service mode, but that was much easier to adjust with the cables in the right location.
So the bottom line is to make sure that you know exactly were each cable goes after you disconnect it. It is of course common sense, but easy to make mistakes, especially if there is a long period of time between when you disconnent and reconnect the cable. I am lucky my screw up did not damage another part of the circuit.
Anyway Thanks again!!!
Sal
I had some water problem
I had some water problem (some water dripping on the KP-46WT510) few months ago.
It looks like I have same problem. Everything works, except the picture is distorted (3D and curved). Can I assume that ONLY some fuses are bad, or should I replace IC's also.
What do you think?
if the water got on the
if the water got on the boards then yes the water could have been a culprit, but if the water was not a factor, then the ic's are out.
I'll try to check fuses and
I'll try to check fuses and replace, then.
I hope it will be it.
Thx
sal, glad to hear you worked
sal, glad to hear you worked out your problem.
Larry Dillon said: Dave, I
Larry;
Received the manual as stated and have downloaded software. I have removed the bad stk's and have used my muliti meter on the ohm setting to check pico fuses under the STK's and haven't found any bad ones yet. Is this uncommon?
Check fuses on G board, that
Check fuses on G board, that is the most likely blown.
zapdbf said: Check fuses on G
Larry and zapdbf, I just want to thank you for this thread. I have replaced the stk's on my Sony
KP-46W510 and checked the pico fuses on both boards which were ok. After used the multi meter on the picos and the( new stk's to check my work) I plugged all the wires back in and powered her up. To my suprise it work like new. Flash focus worked as it should but I am still getting the red blinking LED (4) when I turn the set on. The blinks are about 3rd of sec apart but there is just the 4 and then nothing, pic and audio is all ok. Also do I need to do a reset on the dignostics to clear it after this repair on the bad stk's.
Thanks
Dave 608
After you repair the unit,
After you repair the unit, you MUST clear the values on the diagnostic screen. These codes do not reset themselves after the fault is corrected, so if you don't clear them, you'll be seeing "old" fault codes the next time you enter this screen. Clearing is done by going into the service mode (display, channel, 5, volume plus, then power ). Press 8 and Enter, which returns everything to the factory preset condition.
Larry Dillon said: After you
THANKS AGAIN FOR ALL YOU TECH EXPERTISE YOU SAVED ME ALOT OF $$$.
DAVE608
Well that's what were here
Well that's what were here for dude. Also so you do not forget where you got the help, spread the techlore word. We are a great community, about lots of different things for everyone!
i have a sony KP-51WS510 hi
i have a sony KP-51WS510 hi-def, and every time i connect the ps3 with hi-def cable and try to watch a movie, the screen starts to get green horizontal lines. sometimes the lines will come out rite away.and some times it will take from 20 to 45 min. but only if i use the hi-def cable.
does any body have an idea?
there is a sony service
there is a sony service bulliton about playstation, i am not sure if it meats with your problem, but here it is
SYMPTOMS
1 inch Black bar on left from top to bottom, only with play station on Video 5 component in as
the source. Had tech plug play station into video 6 component in, same problem, plugged
other component source (satellite) into video 5 - no problems.
RESOLUTION
Tech found that on the Play Station under Options then go to, Screen Alignment and problem can be corrected
MORE INFORMATION
I can not get he big red wire
I can not get he big red wire out out distribution block pushed wire in and turned both ways still would not pull out. How is it attached can you just pull it straight out?
Push it in and turn
Push it in and turn counterclockwise. Some can be tough to get out.
if you can;t get it pulled
if you can;t get it pulled out, just work on it behind the tv, you still have enough room to flip the board over. and solder it from there.
I have a sony KP-61XBR38 that
I have a sony KP-61XBR38 that has just started this convergence problem you have been discussing , i have downloaded and rviewed the service manual but i am not sure I have the same boards you are talking about (D, G, )I mean I dont think there are icchips with STK's #'s you are mentioning, have I located the right boards or what? I have located a few stk ic's but they have part numbers like stk4412, and stk4278L, Hopefully you can shed some light on this for meand point me in the right dirrection, this has been a beauitful set for over a decade and had a nicer more colorful picture then the new set that is only a yr old....thanks in advance [email protected]
very good for my first time
very good for my first time here, I'll make this site a favorite. Just needed the number before I opened the back
THANKS................
help I need a service manual
help I need a service manual for kp53hs30 please send to [email protected] I need to be able to download it to a zipdrive (public computer)
I am having convergence
I am having convergence problems as well. I have a Sony projection tv. Replaced both STK convergence IC's as well as a couple pico fuses that were not measuring continuity, however, when I power up the tv the picture still has the red ghostly image that is the original problem. Only now it seems worse because the shadowing/ghost image is bowed like. I have gone into the fine tuning of the convergence and am able to move the vertical lines but not the horizontal.
Would appreciate what to look for next or what I am missing in my repair.
Thank you
My screen always looks 3D
My screen always looks 3D even tho i dont have 3D movies its annoying how can i fix it without callin sum1 ta fix it
i have a Sony kv 48v85 and i
i have a Sony kv 48v85 and i don't see any component like this one on the board?
Hi i have also replaced the 2
Hi i have also replaced the 2 stk 392-120 and all the resistors. My lg tv stil have 3 images and blue way out. Help?
TV doesn't come on; screen
TV doesn't come on; screen has no picture. The timer/standby is on with red light and not blinking.
It can be anything from poor
It can be anything from poor soldering, poor quality chips ( china clones), blown picos, etc. This is why we put together complete kits with parts, instructions, and most importantly support.
Ed
Tv Repair Kits
www.TvRepairKits.com
Where can I go to purchase
Where can I go to purchase these parts I need to fix my tv?
Hi Sheryk - You can get parts
Hi Sheryk - You can get parts and instructions from www.TvRepairKits.com
my sony tv has a padlock sign
my sony tv has a padlock sign on the screen and i have tried to remove it but ican do it , what should i do to get it removed. Thanks
this is nice blog.
this is nice blog.
----------------------
Subhash
Cheap Ipod
-------------------------------
can anyone help me please?
can anyone help me please?
when my tv is switched on, the picture comes up like its in 3D. Ive adjusted the red in line, but the blue wont adjusts anymore in line with the other 2 colours.
does anyone know how to adjust the blue so the picture is perfect? the blue is about an inch out (to the right)
thanks
can anyone help me please?
can anyone help me please?
when my tv is switched on the picture comes up like its in 3D.
i managed to adjust the red and all that but i cant seem to adjust the blue. its about an inch out.
does anyone know how to adjust the blue?
thanks
Your tv has a convergence
Your tv has a convergence problem. I just fixed one for a friend last year by using a convergence repair kit from the site http://www.tvrepairkits.com
anybody know what to do when
anybody know what to do when you turn on the set blinks 10 times and cuts off
It depends on the model
It depends on the model number and known issues. On that model I believe it's a pair of mcz chips that fail and cause it to blink between 6-10 times. Same site www.tvrepairkits.com has parts for this issue also
oh really ?
oh really ?
What does it mean when the little red light on the front of the TV blinks 6 times....?
Jennah Smith
PMS Relief
My older sony projection tv
My older sony projection tv is showing red with thin white horizontal lines in it the sound is fine and you can see a picture for only a second or two when it first comes on then it goes back red. Is this my color wheel or my bulbs? I wouldn't know what it is like when the bulbs go.
My older sony projection tv
My older sony projection tv is showing red with thin white horizontal lines it it. the sound is fine. it briefly will show a picture when you first turn it on with red over it, then just red with lines. can you tell me what this is.
Thank you for taking the time
Thank you for taking the time to post this article. I've been all over the web researching this topic and no one has mentioned pico fuses. I replaced the STKs first and it didn't work, then I found a blown pico fuse on the G board and now I'm back in action, thanks again!
I think I'm having similar
I think I'm having similar issue with my Sony projection HDTV (CRT based)-57inch. I think I got the tv back in 2004. Not happy with Sony's durability on these sets. Anyway, I'm not going to attempt to DIY due to high voltage and soldering requirements. How much should I expect for it to cost if I call a local tech and/or Sony approved tech?
I don't really know much
I don't really know much about electronics but I was able to fix my projector tv with a similar problem with the clear instruction and parts I found on tv repair kits website. They have clear instructions and pictures which made it possible for me. Here is the link I hope this helps...
http://www.tvrepairkits.com/xcart/home.php?partner=tiger670
I have a Sony KP-65wv600 rear
I have a Sony KP-65wv600 rear projection television which has the convergence problem. I did some research and made sure that the proper ICs were ordered (STK 392-506). I replaced these ICs, checked the Ohm on the resistors and fuses under the heat sinks, which checked fine. I turned on the television and still had the convergence issue. I checked the heat sinks with my hand and found that one was warm, the other was not, I am assuming this IC is not working properly. I replaced the fuses for that particular IC and tried again, still did not warm up and still had the convergence issue. I replaced that IC with another STK IC (I ordered 3, just in case). This still did not fix the problem. I read your above post, I don't know where the "G" board is to check those fuses. I have the "D" board memorized by now, there is a vertical daughter board on the right hand side of the "D" board, but this didn't have any fuses visiable and it had a metal shield around most of the components (I'm assuming to protect it from radiated signals".
My main question is what can I try now? and where is this "G" board on my television so that I can check the fuses on it?
Thank you for your time.
There is a little more
There is a little more involved than just changing out the IC's and that is why I got the kit from tv repair kits website because it had everything I needed to complete the repair, the convergence chips (which are high quality OEM chips), fuses, resistors and instructions with photos for each step to help locate the fuses panel etc. I know you already purchased the IC's but the kit is worth every penny and one or both of the IC's you purchased could be faulty. I looked up the kit for your TV and it is $76.95 which is a fraction of what it will cost you to purchase a new 65" TV. Listed below is what comes in the kit and the link to get there.
http://www.tvrepairkits.com/xcart/home.php?partner=tiger670
Kit Includes
•OEM Sanyo Convergence Chips. These are genuine OEM Sanyo chips. Sanyo was the primary supplier of convergence chips used in TV sets made by Philips, Sony, Hitachi, Panasonic, Toshiba, Mitsubishi, and many others)(2 per kit ). We do not use lower quality generic convergence chips in our kits like other sites.
•Convergence Resistors - These are specifically designed and rated for convergence circuits. Do not use anything but convergence rated resistors when doing these repairs.
•Pico Fuses - Each kit includes a set of pico fuses specific to your model.
•Thermal Paste
•Photo Instruction Manual - Complete Instructions on how to repair your TV. This is a step by step photo instruction guide that will walk you through each step of the repair. All of our repair guides are non technical and easy to follow. You do not need to have any prior electronic repair experience to use this kit.(Download Version - allows you to view/zoom/print from your computer)
•Soldering Instruction Manual - Complete instructions on how learn to solder like a pro in less that 30 minutes.
•Email/Phone/Live Chat Support
I got my new STKs today, and
I got my new STKs today, and half the pins on each were bent (smushed) from being shipped in a paper packaging, as if someone had stepped on them. I spent 30 minutes carefully straighting them, as I have done so many times on CPU's that had a huge number of pins smushed.
Long and short of it, when I got everything almost just right, one of the pins broke off inside the STK. It is still hanging on in there, but it wiggles like a loose tooth. So I'm thinking worst case scenario, the wire or solder has broken, and its being held from falling out just by the plastic case.
This is either pin 17 or pin 6, depending on where pin 1 actually is (I can't figure that out).
My question is this... can I take a drill and carefully drill a large shallow hole over the hard plastic case of the loose pin, so I can look inside, and get in there with a soldering iron tip and a bit of solder and solder it back on?
What do these things look like inside? What I am assuming, are the ICs are surface mounted in the center to the metal backplate, and up by the plastic surface area, particularly around the edges, is nothing but space / air.
Have you ever opened one of these up, and can show me a picture or tell me how its oriented inside? Or tell me some procedure to get this #$%^* bakelite looking case seperated from the base plate???
Pages