
Why Put iTunes M4P music onto Windows Media Player?
When you purchase music from iTunes Store, you actually get DRM protected content (in protected AAC or M4P format), which you will not be able to play on MP3/MP4 players and other non-Apple mobile players. You cannot directly transfer the M4P files to Windows Media Player, either. In such case, the option is to burn those tracks to an audio CD and then rip them (with iTunes or Windows![]() Media Player) once again to your computer hard drive wherein the DRM will be removed and you will get the tracks in (DRM free) MP3 or WMA format. After this you will be able to transfer them to Windows Media Player.
Media Player) once again to your computer hard drive wherein the DRM will be removed and you will get the tracks in (DRM free) MP3 or WMA format. After this you will be able to transfer them to Windows Media Player.
In case you have purchased a great amount of music from iTunes Store, you can go ahead and use TuneClone M4P to MP3 Converter which acts as a Virtual CD-ROM drive on your PC and lets you remove the DRM element without having to waste actual CD's, with the music ID3 tags info well preserved.
Step by Step: Burn and Rip iTunes M4P Music for Windows Media Player?
1. Insert a CD-R or CD-RW disc into your CD-ROM drive.
2. Burn the iTunes M4P playlist to make an audio CD. You cannot select the "MP3 CD" option since it requires the DRM protected iTunes M4P files be converted to MP3 or WMA files for Windows Media Player.
3. After the audio CD is successfully burned, insert the disc into your CD-ROM drive again. Then you can use iTunes or Windows Media Player to import the music tracks on the burned disc as MP3 or WMA files.
Step by Step: Convert iTunes M4P Music for Windows Media Player with TuneClone
1. Create a new playlist in iTunes.
2. Add the M4P songs to the playlist.
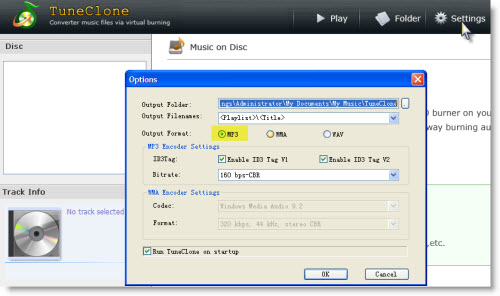
3. Launch TuneClone M4P to MP3 Converter. Click the "Settings" tab. In the pop-up window, you can specify output folder, output file name format, output format (choose MP3 or WMA), etc for the output files.
Note: You can check whether TuneClone virtual CD drive is successfully installed and where it is installed in the bottom left corner of the interface.
4. Switch to iTunes. In iTunes, click the "Burn Disc" button.
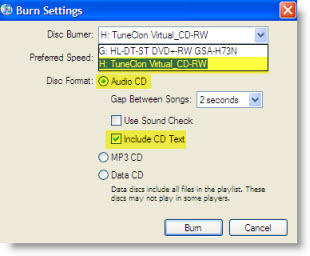
5. In the pop-up window of "Burn Settings", select "TuneClon Virtual_CD-RW" from the "CD Burner" drop-down list, click the radio button next to "Audio CD" and tick "Include CD Text" option. Click "Burn" to start burning.
6. Upon the completion of burning the disc and encoding the music, you can open the TuneClone manager screen to show all the converted music files. To locate the output folder, simply click the "Folder" tab on the interface.


