
So you're tired of the stock stereo that came with your car due to it's lack of features, sound quality, or just overall flexibility.
Time to upgrade.
I will provide a brief overview of how to install an aftermarket head unit, however, my main intent is to dispel some common problems that seem to accompany amateur installations.
If you have a double DIN head unit (meaning the stereo is about four inches high) do not dismay. There are many aftermarket dash installation kits that cost around $20 and will convert your double DIN opening to a single DIN opening. Single DIN head units are about two inches tall, are MUCH more popular, and are generally lower priced and have better features.
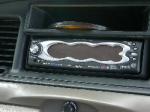
Beginning actual installation, you want to be able to know how to get your car stereo out of the dash. Honestly, there is no consistent method to doing so. Ford head units will have two holes on either side that you can stick a coat hanger in, bend out, and slide the head unit out (a trick is to also use two flathead screwdrivers that slip between the side of the unit), whereas many Honda's and foreign cars can require complete removal of the whole dash! The best way to find removal instructions is simply a google search.
Once you have removed your stock head unit, next is the mounting cage. This needs to
be pushed into the slot with the flared edges pointing outwards towards you. Then, with a flathead screwdriver(preferably,
though other objects will certainly work), bend the metal tabs outward
so that the cage cannot be removed without considerable force. You may install the mounting cage after you have wired the head unit if you choose (most do) but I have included it here in case you don't feel like unplugging your head unit and all appropriate connectors to get the cage in.
Next is hooking up your stock wiring harness to your aftermarket stereo. There is a COMMON misconception that you have to cut the factory plug and match wires to the aftermarket head unit. There are wiring plugs sold at Best Buy, Circuit City, and even on the internet that can simply be plugged into your stock head unit harness, and have all of the matching colors for your aftermarket head unit. The benefit to this, is once you decide to sell your car or just remove the aftermarket head unit, all you have to do is unplug the aftermarket and plug in the new one; no wiring, crimping, anything that tedious.
If they do not make a plug for your car and you must cut off the factory plug, then I suggest registering here: www.the12volt.com, once registered, go here: http://www.the12volt.com/installbay/v... They have a comprehensive wiring database of nearly any car made.
My favorite method is to buy bullet butt connectors, strip the wires, and crimp them together, however, you may also solder the wires together and put heat shrink tubing on them. Any connection method that is 1)insulated and 2)secure will work fine, actually.
If you have external amplifiers, now is the time to hook up the RCA cables and remote wire. REMEMBER: the remote wire for your amplifiers is the blue wire with a white stripe NOT the solid blue wire. The solid blue wire is for a power antenna. You will know that you hooked it up wrong if the amplifier doesn't turn on when you're listening to anything but AM/FM (because power is obviously sent through the antenna turn-on only when it is needed).
Don't forget to hook up your antenna lead!
Once the above steps have been taken, you can simply slide in your new head unit (make sure you push it in until it clicks!). Then, put the trim ring on it (for the sake of aesthetics, I would highly advise putting the trim ring on), replace any removed dashboard cosmetics, and you're done!


