

Aug. 01, 2006 - by Mike Pearson
|
Related Articles from Electronic House |
| Stay Cool with LG’s HDTV Refrigerator |
| Remodel Inspires Tech Overhaul |
| AT&T Intros Video Monitoring Service |
With $200 and a couple of free hours, you can install a convenient and energy-efficient lighting control system.
Not so long ago, lighting control systems were only available inhigh-end or custom homes at a high installation cost. Today, newproducts and technologies put lighting control within reach of anyhomeowner.
In a networked home lighting system, keypads and controllers are usedto remotely turn lights on and off and to change their intensity.Imagine the convenience—and the cost savings—of being able to punch abutton on a keypad by the front door and turn off all the lights inyour home when you leave for the day, or the security of having akeypad in the garage that turns on selected downstairs lights so younever go into a dark house.
A number of do-it-yourself lighting automation solutions have recentlybecome more attractive with the inclusion of wireless technology. Thebeauty of some of the newest “wireless” systems is that they use radiofrequency technology in conjunction with a home’s existing wiring tomake installation easy and control more comprehensive. These productswork with what you have—there’s no need to worry about running wires orhiring an electrician.
Lighting Control: Where Do I Start?
The hardest part of home lighting automation is understanding what’spossible and then deciding where to start. Fortunately, given today’stechnology, you can implement your automation projects in stages: youmay decide to start with one room or, say, the main floor and thenextend the network.
We’ll begin this lighting automation project by replacing a singlelight switch with a keypad that remotely controls selected lights onthe main floor. A number of lighting scenarios, or “scenes,” can becontrolled from keypads, but we are going to focus on only one scenefor the sake of simplicity.
We will set up the first button on the keypad for an “I’m Home” scene.When we’re done, pressing the “I’m Home” button will turn on the porchlight, the family room lamp, and an overhead florescent light in thekitchen.
Lighting Control Equipment List
To implement the “I’m home” scene, you need to create a network betweenthe keypad and all of the lights you want to control. That is, you needto ensure that every light source in the network is connected to aremotely controllable hardwired switch or plug-in module. In this case,we are concerned with the keypad, the porch light, a family room lampand the overhead florescent light in the kitchen.
Our shopping list looks like this:
- One programmable keypad to replace the light switch by the front door (it already controls the porch light).
- One lamp module for the family room lamp.
- One relay switch for the florescent kitchen light.
- Two RF signal devices.
RF signal devices are integral to a wireless system. They create thenetwork by simultaneously transmitting and receiving messages acrossradio frequency and your home’s existing wiring. There is noinstallation necessary for RF signal devices; they simply plug intoexisting outlets. And the really good news is that, once installed,they have you covered for some time to come. You will be able to addmany additional light sources to your network without buying additionalRF signal devices.
Continue to page 2 >> [[page]]
Lighting Control Installation
To begin, plug the RF signal devices into outlets some distance apart.Refer to the installation instructions for placement. Plug the lampmodule into the family room wall outlet and plug the lamp into it.Replace the florescent light switch in the kitchen with a relay switch.Since florescent lights cannot be dimmed they require a non-dimmingrelay switch.
Following the manufacturer’s instructions, install the keypad. As an example we’ll install an INSTEON-enabled KeypadLinc V2.To install this device all you need to do is remove the old lightswitch, reattach the line, load, and ground wires with the addition ofthe neutral wire. The following step-by-step instructions will guideyou.
Installing the KeypadLinc
- At the circuit breaker or fuse panel, disconnect the power for all of the circuits in the switch junction box.
- Remove the faceplate from the switch junction box, then unscrew the switch and pull it out from the junction box.
- Disconnect the wires from the switch you are replacing and ensure you have 1/2-inch of bare wire on the ends.
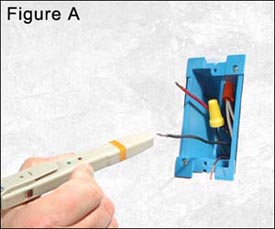
- If you are installing KeypadLinc into a two-way circuit (where one switch controls the load), follow the diagram in the KeypadLinc’s Quick Start Guide to identify and connect the LINE, LOAD, NEUTRAL, and GROUND wires. If the colors of the wires do not match the diagram, be sure you have identified the wires correctly before connecting them. (See Figure A).
- If you are installing into a multi-way circuit (where more than one switch controls the load), consult the manufacturer’s user’s guide.
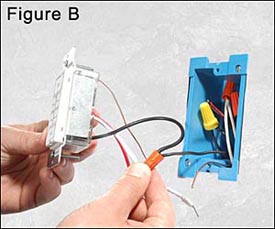
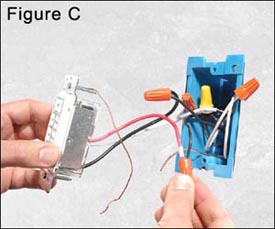
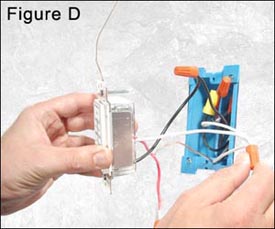
- Ensure that all wire connectors are firmly attached and that there is no exposed copper except for the GROUND wire. (See Figures B-D).
- Orient the KeypadLinc Dimmer with the ON button on top. Gently place it into the junction box. Screw it into place.
- Turn the circuit breaker back on or re-install the fuse.
- Test that KeypadLinc Dimmer is working properly by turning the light on and off.
- Reinstall the faceplate.
Note: The NEUTRAL wire will not normally be connected to theswitch you are replacing. If there is no NEUTRAL wire in the junctionbox, please consult an electrician or call the manufacturer’s technicalsupport line.
Once installed, the keypad can then be programmed at the keypad orby computer using specially designed software. The whole installationtakes only a couple of hours and can cost under $200. As soon as youare ready to expand the network you can move on to programming otherscenes; “Away” and “All Off” for example. It’s easy to add lightsources and appliances to the network once the keypad and the RF signaldevices are installed.
While this is a very simple example of a remote control lightingsystem, you begin to see the possibilities and the ease of installationafforded by today’s lighting control products. After using lightingcontrols in one room and experiencing the associated convenience,comfort and cost savings, you won’t want to stay with traditionallighting in your home.
Mike Pearson is a Senior Product Manager at SmartLabs, Inc.
More Photos
 |
 |
 |
 |


