
From Issue #3, Page #68
-Submitted by TechLiving
by Chris Arndt
| Related Articles from TechLiving |
| Lite-On Launches HDD DVD Recorder |
| TiVo vs. Echostar: Fight! |
| TiVo Lets Guru Be Your Guide |
DVRs, VCRs, and DVDs—oh my! About 10 years ago, connecting the TV to your VCR and a cable TV box seemed like a stumper. Most of these connected via the antenna jack; few could be connected to baseband A/V inputs on the relatively few TVs that had them. Now, the choice of video sources has exploded. When the number of sources is greater than the number of inputs on the TV, consider adding a video selector.
A video selector takes the outputs from several different video sources, and selectively connects one or another to a single common output. The switching can be manual via front-panel push-buttons, it can be remotely-controlled with a "clicker," or automatically switched by the selector itself.
Don’t confuse a video selector with a video switcher. Generally, a switcher is a device that does TV-station-style special effects like dissolves, wipes and fades between video sources (DVD, satellite, and more). It would do the same job as we want, but at higher cost, and not with a remote control. Sometimes, too, the two terms are confused, however, and selectors are sometimes called switches.
STEP 1: MONITOR INPUTS
Figure out how many inputs you need now and are likely to need in the future. Make sure to include an extra one, just in case. Keep in mind that when we talk about an input or output (as in the VCR output), we are actually talking about three jacks: one for video and one each for left- and right-audio channels.
Our entertainment center has a VCR, DVD player, PC, four satellite receivers and a videophone—eight inputs total. In addition, I like to have one spare for temporarily plugging in a camcorder. So bump that up to nine inputs.
Now, figure out how many inputs your television has. Our new plasma monitor has seven, but only three of them are for regular video. Three of the others are HDTV digital inputs and one is for a PC. That meant we needed another six inputs. However, one of the satellite receivers and the DVD player each have HDTV outputs. Those can connect to two of the HDTV inputs on the plasma, still leaving four without a home.
STEP 2: SELECT A SELECTOR
Video selectors come in different sizes and ways to switch between inputs. Choices range from manual two-input devices to eight inputs with a remote control. In addition, some can convert between S-Video and RCA-type connections. Some high-end ones will even switch optical A/V signals, but those are beyond the scope of this project.
If you rarely need to switch between sources, an inexpensive manual selector might suit your purposes. However, manual operation means a hike over to it and pushing a button. A four-input manual selector can be had for as little as $22. It’s not a lot of effort if you switch it once a week, but you can burn off some serious beer and pizza if you need to switch between inputs often.
Some of the more expensive selectors have a TV-style remote control to add to the pile on the coffee table. These let you pick the input you want to watch from the comfort of your recliner. If you don’t like the idea of adding another remote to the clutter, pick a model that automatically chooses the input that was last turned on.
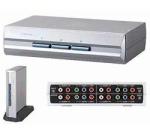
For this project, I chose a Sima SVS-4D. This unit has four inputs, and converts S-Video to composite video, and analog audio to digital. The two sets of outputs are in parallel, so you can send the same program to the TV and the VCR, and it will switch between inputs automatically or by remote control. I got it online for about $120.
Remember that each source has three jacks associated with it: video and left and right audio. Our four-input selector therefore has 12 input jacks and three output jacks on the back, so it’s a busy place. (Actually there are more jacks than that, because of the S-Video and digital audio connections, but most installations will use three cables and jacks per source.)
Continue to page 2 >> [[page]]
STEP 3: what goes where?
Before you head off with a fist full of patch cords and start hooking things up willy-nilly, think about how you watch TV and the flow of the various signal sources. For instance, our TV has a set of inputs (Video 3) on the front. These are handy for temporarily connecting a camcorder, game console or other external device, compared to spinning the TV around every time. So I consider these to be "spares."
I like to use the TV remote to select between the satellite receivers and the VCR, so the TV’s Video 1 is for satellite, and Video 2 is the VCR. And as I said a while back, one of our four satellite receivers uses HDTV inputs on the TV, so there is three remaining. Those three are connected to the Sima selector, along with the D-Link videophone.
The Sima is now mostly a satellite selector. Since all of the satellite sources are salved to the same big ugly dish (BUD), there’s never a time I want to see two at once, so the selector is perfect. And we don’t use the videophone enough for its use to conflict with satellite watching.
Remember the signal flow too, and you will save yourself some serious troubleshooting time. You are running the outputs from the VCD, DVD player, etc, to the inputs of the video selector, and the output of the selector to an input of the TV. Get it backwards, and you probably won’t screw anything up, but it won’t work either.
Confused? Our entertainment center had "evolved" over the years into a big rat’s nest of cables and a kludge of connections. Now the selector has made TV viewing a lot easier and more civilized.
Project Snapshot
The Problem
There are more video sources—satellite receivers, cable boxes, DVD players, VCRs, DVRs, games—in today’s entertainment center than most TVs can handle. A video switch makes the possibilities virtually endless.
Project Steps
Determine the number of inputs needed.
ÂÂ?Select a selector.
ÂÂ?Hook everything up.
Cabling Tip
Paying attention to color codes will help keep the connections straight. On most equipment, RCA jacks are colored yellow for video, red for right-channel audio, and white for left-channel audio. And labeling your cables will make it easier to work on in the future.
Bonus Info
Equipment Tip
If all you need is one more input, use the one on your VCR. Then use the VCR’s input selector on the front panel or remote control to switch to it. Some VCRs even have two inputs.
What About the Writer?
Name: Chris Arndt
City/State: San Luis Obispo, Calif.
Occupation: Telemetry and instrumentation technician
One thing people would be surprised to know about me:
I’ve worked for my present employer for half of my life!


